
Xen
Keith Smith - My Blog > Xensystem_thread_exception_not_handled xen.sys BSODFriday, September 4, 2015 - Posted by Keith A. Smith, in VMware, Xen, Microsoft, LinuxThe system_thread_exception_not_handled xen.sys BSOD issue was interesting to me; 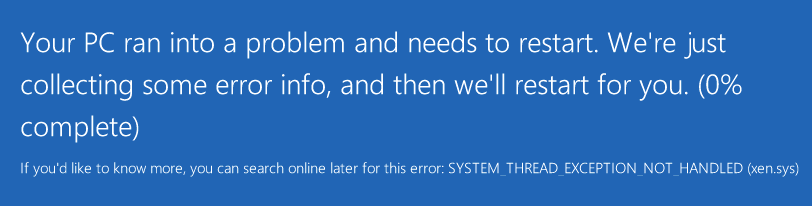 I wanted to see if I could reproduce this. I exported a VM from Amazon's EC2 because Amazon EC2 uses the Xen hypervisor as well. I upload the VM into a datastore on vSphere and convert the virutal disk as I noted here http://bit.ly/1UrCpqN I power on the VM and I get the same system_thread_exception_not_handled xen.sys BSOD. I boot into safe mode I run a msconfig from the search, Under the boot tab I chose base video because I still had the xentools installed on the VM's. So that had to be the culprit right? I reboot the VM, and it boots fine, at this point I uninstall all the XenServer/Citrix related items. I then restart the VM and I was glad to see it make it to the login screen. Solution: I think...  The way to avoid this issue if you are going from Xen to VMware or any other hypervisor is to uninstall all the XenServer/Citrix items before performing the export of the VM.
|
 1 Comments 1 Comments Tweet
Tweet
|
XenServer to VMware MigrationFriday, September 4, 2015 - Posted by Keith A. Smith, in Network, VMware, Xen, MicrosoftWell, it's time to put XenServer out to pasture in favor of vSphere 6.0, the coolest thing I will miss is XenCenter which can be installed on any modern Windows OS. In the Citrix world, you do not need a dedicated XenCenter server. In the VMware world you do need a dedicated vCenter server. Not that big of a deal, but something to note if any of you start comparing the products. Start with interoperability testing In the past, I have used some version of the vCenter Converter to convert VM's from some other product. I figured I would test the theory of simply exporting a VM's from xencenter in an ovf format and importing it into vcenter. That attempt failed with the following error "Could not parse the document: 'encoding specified in XML declaration is incorrect". Upon testing the same ovf export on VMware workstation and virtualbox I received the same error. Back to the old Method It would have been great to power off VM's then export them from xencenter, then import them into vCenter. With this not being possible at the time I proceed to fire up the vCenter Converter. Using the vCenter Converter I was able to convert a few of the VM's, in some of the other attempts I received errors like converter error "Host hosts.allow: ALL:LOCAL,x.x.x.x hosts.deny: ALL:ALL Another workaround for the *nix VM's is to upload the virtual disks to the datastore, and then proceed to convert them. At this point, you could create a new virtual machine and use the new created virtual for that machine. For me, this worked great, and the *nix VM's would boot successfully. In some of the other cases, I changed from hostname to IP in the vCenter Converter, and that allowed me to convert the nix VM. I also had some instants where Windows VM's wouldn't convert; they would fail and say 3% network is unreachable host key can't be retrieved or a certificate in the host's chain is based on an untrusted root converter. For the VM's that gave those errors, I installed the vCenter Converter on the VM itself and chose This local Machine at the target. As you can see, I did quite a few workarounds to keep making progress on exporting the VM's. Into to vSphere as the final destination At this point, I have all VM's exported, I proceed to upload them into a datastore in vSphere environment. After the uploads were complete, I had to convert the disks to proper vmdk's that could be used by the VM on vSphere. On the hypervisor I enable SSH, I then proceed to SSH into the hypervisor and make my way into the datastore that housed the VM's. There were quite a few sub directory's so I had to travel into each one cd /vmfs/volumes/whatever/foldername/VMName then run vmkfstools -i currentvirtualdiskname.vmdk newvirtualdiskname.vmdk I had to do that for all the virtual disks that were uploaded. Once all that was done I added the vmx files to the vCenter Inventory, from there I had to remove the original virtual disk's and attach the new virtual disk I created. In the process, I was prompted to remove and delete the old virtual disks which is nice because that way I won't have to go back and clean up the old virtual disks. I now power on one 2012R2 VM and one 2008R2 VM for testing to ensure that they boot up and function as they should. The 2008R2 boots fine however, the 2012R2 VM blows up with the BSOD. I power up another 2012R2 VM so see if this is a one-off or not, of course, the same result of a BSOD with the error of system_thread_exception_not_handled xen.sys.
At this point I know there is something wrong with 2012R2 and Xen, I had to boot up the VM in safe mode by choosing Troubleshoot. 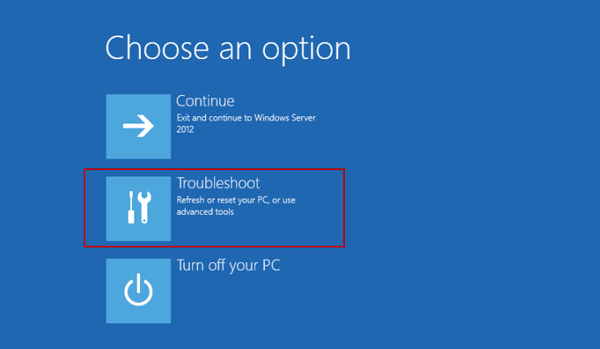 Click Advanced options 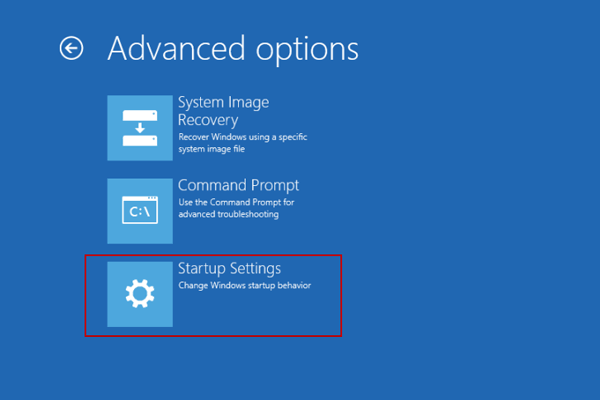
Click Startup Settings. 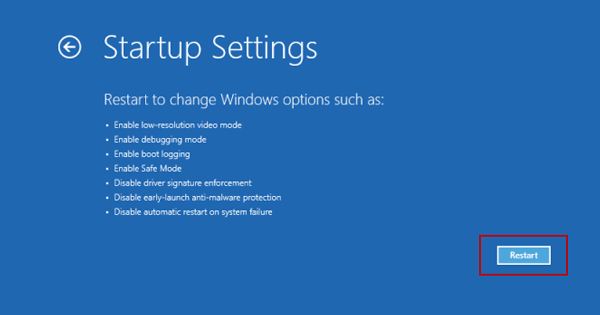
Click Restart Once in safe mode I run a msconfig from the search, Under the boot tab I chose base video 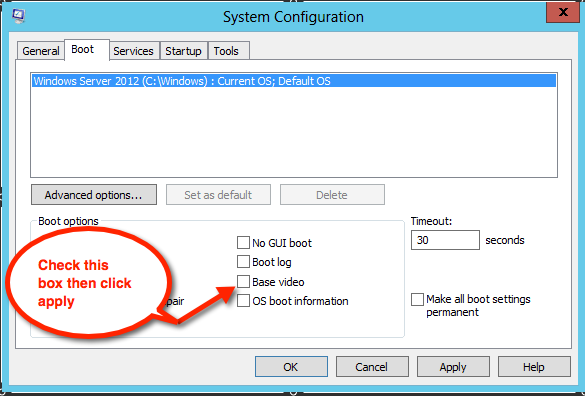
I still had the Citrix/Xen related items installed on the VM's, so that had to be the culprit. 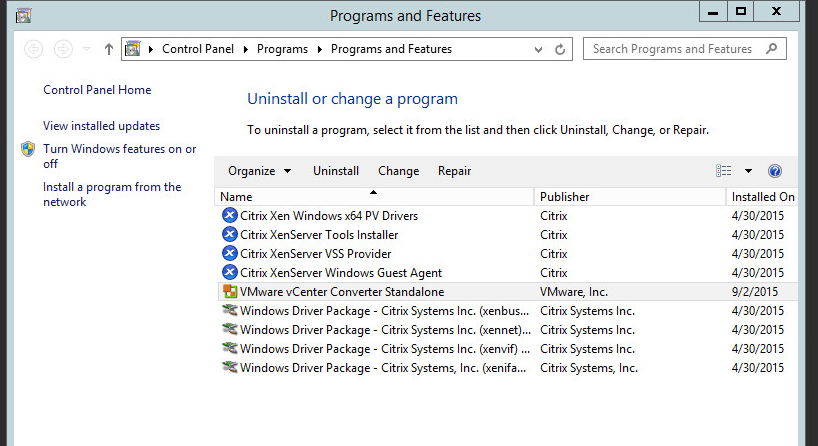
I reboot the VM and it boots fine, at this point I uninstall all the XenServer/Citrix related items. I then restart the VM, and I was glad to see it make it to the login screen. I did have some cases where the VM did BSOD after the msconfig modification and XenServer/Citrix items were remove but upon a restart the VM does proceed to the login screen. I had to do the aforementioned procedure for every 2012R2 VM that had a BSOD system_thread_exception_not_handled xen.sys. I should note that this project took me about 3 1/2 days to complete due to the above technical complications and many other variables.
|
| 0 Comments
Tweet
|
xackup for xenserverSaturday, June 20, 2015 - Posted by Keith A. Smith, in XenI recently was tasked with to rebuild an entire xenserver farm, i
started to put together a plan of action on how I was going to
accomplish this. I started thinking about the servers, I figured I could
grab a USB sticks and create some bootable USB sticks
from the xenserver iso. Next I made note of all the hypervisor network
settings (screen shots are the best way to go) so that part was covered,
lastly can the virtual guest and storage. A new NAS was going to be in
play so i needed to find a way to backup the guest and export them, I
found a software called xackup which was priced
right but I wanted to vet it before making a purchase. I downloaded the
trial (14 days for the elite version) installed on a test machine to put
it through its paces, I backed up one guest while it was running to see
how it would handle it. The backup ran smooth and didn't cause any
errors or outages which was great, now I wanted to test the restore
capabilities of xackup. Since the virtual guest I
was working with wasn't important I powered it off and deleted it, yes
you read that right. Since I haven't used this product before I did have
an xenserver export (e.g. .xva) file just in case xackup failed me. I proceeded to restore the virtual guest with xackup,
about 20mins later the restore was complete and the guest vm was in
great shape which i define as (virtual disk restored & attached,
network settings correct, OS start up clean, etc) once all I confirmed
all that I knew this was going to be my tool of choice. I proceeded to
backup all the virtual guest which took quite bit of time then i
reviewed the log reports for each virtual guest backup, they all were
successful with no errors.
I then shutdown all the guest, followed by the hypervisors and lastly the storage array. Next I swap out the hypervisors along with storage, with all the new gear in place I get the install for xenserver going on all the hypervisors. While the installs were running for xenserver, I setup the LUNs on the NAS so the I can point the hypervisors
at the correct targets. Once the xenserver installs were completed, I
setup the network addressing and make sure the NTP is working correctly
(I have had issues with this in the past) then I launch xencenter so I
can setup the networking on the hypervisors, create a pool,add the
hypervisors to the pool then finally map the CIFS and iSCSI storage. Now
here comes the fun part i need to restore all the virtual guest, I
launched the xackup software so I can start restores but at that point
in noticed that there is no way to restore all the guest at the same
time nor anyway to schedule the restores. That was a big flaw to me
since you can schedule multiple backups, so I was stuck having to
restore each guest two at time (I had 2 laptops running with the xackup on it) and eventually everything was backup and running on new shinny gear. I have made a few suggestions to the developers of xackup but overall I think its a great tool for the price and its simple, effective and affordable.
|
| 3 Comments
Tweet
|
XenServer VM BackupsTuesday, June 2, 2015 - Posted by Keith A. Smith, in Xen
I've been trying to conjure up some way to backup the guests that reside in a xenserver virtualized environment. I started off by looking at what i would call my usual suspects (e.g. unitrends, alike, etc.) unfortunately in this situation they all let me down for one reason or another, so i did what most creative minds do when they can't find a solution "Make my own". I figured i start by jumping on to the cli at the host, i know most hypervisors reference the guest by UUID's. I spent sometime looking through the variables and commands on the host, i eventually came up with
# xe vm-list which produces the following output for all guests uuid ( RO) : 15b96001-84c6-83d1-ef11-8gh6509i122j name-label ( RW): nameoftheguest power-state ( RO): running Another command i saw that was available was #vm-snapshot, so i figured I'd try and string it together by doing a xe vm-snapshot uuid=15b96001-84c6-83d1-ef11-8gh6509i122j or tab which display all uuid's. And the tale of the command i place name-label=snapshot, so the whole thing would look like xe vm-snapshot uuid=15b96001-84c6-83d1-ef11-8gh6509i122j name-label=vmsnapshot Now that i saw that worked i figured i would develop a crontab task using the #crontab -e command that would run a shell script (which i will post at another time) to handle this redundant task which was version1 of this solution. Once I uploaded the shell script i needed to make it executable, which i did by running the chmod +x filename.sh command. I attempted to execute it and got a error bad interpreter - No such file or directory, some times when you move files from DOS/windows to linux or nix system you run into the ^M charater problem. The way i have solved this so many times is simply to open the file in the vim editor using the following command vi -b filename.sh once the file is open you will see ^M at the end of each line, the quickest way to remove this is to run :1,$s/^M//g the trick to this command that you don't really type a ^ character and then a M character to generate that command. You actually type a [Control][v] and then a [Control][m] to create the necessary character then do a :wq to write and quit the editor. I figure it must be punishment for not developing the script in the vim editor in the first place. So far this has been working for the xenserver environment, in version2 of this i included retention elements and frequency of backups for individual guests. In my last version3 i added more comments to the script because the code was pretty extensive at this point (over 100 lines of code). The next item i have on my dev to-do list would be to add some mail functionality, so i can be notified of the out come of the backup job. Note: this files used to perform the backups should copied from the hypervisor prior to any upgrades.
|
| 0 Comments
Tweet
|
The start of the madnessFriday, August 29, 2014 - Posted by Keith A. Smith, in Network, Xen, Journal of thoughts
After deciding to cut the cord in February of 2014 I thought I should build a network to support our entertainment needs. I cancelled our FIOS tv service because of the annual rate hikes and went internet only in order to save more $$$, besides we didn't watch a whole lot of tv and when we did it was only certain channels. After killing the tv service i was to negotiate a bump in the bandwidth from 25/25 to 75/75 which was much needed. I started by purchasing a box of CAT6 and since i already had the other items (e.g. connectors, crimper, etc.) I made a weekend project out it. I put in drops in every room and in a few other areas which was a pain to get to, those areas were costly because i put holes in the ceiling while in the attic. Next i purchased the 1513+ synology nas for about $842 from amazon in july of 2014, I got it diskless because i didn't know what drives i wanted to put in it at the time. I settled on 5 of the Western Digital Caviar Green 3 TB SATA III drives which ran about $674 from tigerdirect.
At this point i had to make a call on what switch and new firewall i was going to use, i thought to go cisco and grab a 3750x along with an ASA 5510. That never happen because IOS requires you to have SMARTnet to download the bits now, so with that i moved on to HP (which used to be 3com) and i used those switches before and they worked great. I managed to fined a 1810g procurve managed switch from amazon for $169, i then started doing some research on firewalls again. It now was down to juniper,fortinet and sonicwall, i always liked sonicwall along with juniper but sonicwall was still more than what i wanted to pay and juniper seemed limited on throughput in the price range i was looking in. I checked out fortinet but i still wanted to find something else to compare it to, i somehow stumbled upon the watchguard line. I did some deeper internet research on the watchguard products and i liked what i saw on them. I managed to find a demo of what the web interface was like from a management stand point and i was sold on it, at that point i started looking for models and prices for watchguard. The T10 ended up being the one i was willing to start out with, i purchased it from Newegg for $200 and the license from cdw for $60. All the network gear arrived on a Friday which was perfect because i would have time to get it all setup over the weekend, i started with the firewall thinking it would be the fastest to setup. I was wrong on that thought....i setup the rules that was needed along with the vlans on the 1810g, the main issue was that nothing had outbound access to the internet. I tinkered with the rule base for hours, i then came to point where i knew i had setup everything correctly and the cause had to be something else. It was late (around 2am) i went to sleep because i was out of ideas at the time and kids were driving me nuts because they couldn't watch tv thanks to me. I woke up around 7ish to get back at it, i finished the config on the switch and i was sure that i setup the firewall correctly but still no outbound traffic was allowed. I did a lot of internet research but didn't find anything that really helped, i proceeded to review all the docs that came with the T10 again to see if it was something that i missed. At this point it was around 7pm Saturday and i was able to find everything i needed to call support because i had a thought that perhaps this device needed to be activated before use. After speaking to support i was right, they have a live subscription that needs to be activated so we took care of that and bam outbound internet access. It's always the small things that cause the bigger issues, once that was resolved i was able to bring all the amazon fire tv's up along with the wi-fi. Now that the internet was up i could move to the NAS. I setup the 1513+ synology with the 3TB drives i bought and setup the lacp along with the bond, that was pain mostly because of the way i setup the interfaces on the switch. For some reason the 14, 16, 18, and 20 were apart of trunk4 but the trunk it self was untagged and the ports were still tagged. I removed the ports from the trunk then made sure they were on vlan4 and untagged, then i put them back into trunk4 as members with LACP and it works like a champ 4GBPS on the throughput. After that i migrated all my data from all the "cloud" services, once that was done i enabled some of the sync features so i could get the things i needed while on the go. The next thing i figured i would work on would be the wifi service improvements, my old cisco/linksys router wrt350n was due to be relocate to light duty since it was the edge gateway/router/wifi ap. I started looking around for the newest wifi routers out on the market, for me it came down to the Asus's RT-AC68U and the netgear nighthawk triband router. The features were about the same so it came down to price, i went with the Asus's RT-AC68U from amazon for $199 and i haven't looked back since. I used the default merlin firmware that came with the Asus's RT-AC68U but it couldn't achieve all that i wanted so i ended up flashing it with dd-wrt which i had used before on previous devices, i was able to setup my hp printer on it so we could print wirelessly but i could get the guest network setup work as i needed it to. The guest network was not stable and it was really because of a bug in the dhcpd, after doing much testing and research i found that it was some sort of issue with the dhcpd on the version of dd-wrt i was running. Enter the wrt350n once again...this time i set it up on its own vlan to for guest wifi devices that needed internet only, this way i could have a proper "guest network". A few months went by then i started working on things again, i purchased a tv/wall mount kit for my mancave and setup my xbox along with a mac mini for entertainment. I also got a few dell optiplex 780's that had been retired from work, i setup xenserver on those and connected them to the 1513+. I started looking at the core of the network and thought well i should buy a rack now so i can organize everything because everything worked but it was an eye sore. I didn't want a 42U rack because i knew i would never have that much gear, i found a neat little Tripp Lite SRW12US 12U Wall Mount Rack Enclosure Server Cabinet on ebay. The specs were perfect on it Height 25" Width 23.6" Depth 21.6" Rack Width 19" Rack Height 12U They seemed to sell in the $400 range on ebay and amazon, which to me seemed to be a bit much for a 12U rack. I spotted one on ebay which was in bidding state, i snipped from everyone at the last minute for $132. At that price it was a total steal and it came with the case nuts along keys for the doors. I bought a universal rack tray to sit the nas on, i also bought another 2gig module for $50 for the 1513+, wire organizer panel $18 and a rackmount PDU for $40 all from amazon. I re-wired all the cables for everything that was close and connected to the 1810g, then i installed everything into the rack. It was sort painful at the time of doing some of the work but end the end it was all worth it and looking back i would even say that it was fun, the next and thing i have on my list is to obtain more powerful servers that will be my next set of hypervisors, i thought to build my own but it looks like it cost around $2000 or so to do that. I have moved on from that idea and looking at used servers that will have enough resources (CPU & RAM) to support the vm's that i want to run, the tough part is finding enterprise type servers that will fit in my small rack. I started looking at older sun and apple servers on ebay because they were cheap, i had a thought to check the HCL for xenserver to make sure this was going to work. I found out that other people had managed to get some versions of xen on to sun and apple servers but i didn't want to chance it, i did decide to use the HCL as a guide that could help me find me next set of servers. I started looking at the dell models and checking out the chassis specs to make sure that the server would fit in the rack, i found a poweredge r210 which looked like it would fit the bill. I ended up buying a 2 of the poweredge r210's and more ram to max them out at 32GB each, after receiving them i went ahead and unpacked them. Anytime i order a used server i check to make sure everything is seated properly (e.g. ram, processor, etc) so far so good, so i rack them and proceed to power them on so i can get an idea of just how noise these servers are going to be together. I let them run for a few hours and i determine that they aren't as loud as a normal 1U server would be, but still a bit too noisy for my liking, so i power them off and un-rack them so i can inspect the fans because they are always the culprit for noisy servers. I did notice that one of the servers was slightly noise-yer than the other, upon my 2nd inspection i notice that they have miss matching fans in them so i decided to order more and remove 1 fan from each. The servers run very quitely now, which is exactly what i wanted.
|
| 0 Comments
Tweet
|
Categories
 All Categories
Network
VMware
FOG aka Free Open Ghost
Xen
Journal of thoughts
SharePoint
Automation
Microsoft
Linux
Security
Apple
All Categories
Network
VMware
FOG aka Free Open Ghost
Xen
Journal of thoughts
SharePoint
Automation
Microsoft
Linux
Security
Apple
Subscription
