
Microsoft
Keith Smith - My Blog > MicrosoftAugust Cumulative updates for Windows 10 (1607 and 1703) Dell machinesFriday, August 18, 2017 - Posted by Keith A. Smith, in Microsoft
Just wanted to leave a little note that the August Cumulative updates for Windows 10 (1607 and 1703) caused us to experience BSOD on our Dell AIO 9030 machines.
Using WinDbg I was able to identify that the Intel Wireless 7260 driver was responsible for the crashes. The only thing I can think is that there were some security updates to the KMDF included in the August updates. Pair that with the fact that the Driver Catalog CAB provided by Dell included a really old wireless driver (from 2015) and the result was BSOD reporting: BAD_POOL_HEADER (19) Upgrading to the latest wireless driver directly from Intel version: 18.33.7.2 https://www.intel.com/content/www/us/en/support/network-and-i-o/wireless-networking/000006024.html Resolved the issues. Hope this saves someone some time. -End |
|
 0 Comments 0 Comments Tweet
Tweet
|
|
Applying a “Defense-in-Depth” StrategyMonday, May 22, 2017 - Posted by Keith A. Smith, in Network, VMware, Microsoft, Linux, SecurityIT Teams and Staff can effectively maintain physical and information security with a “defense-in-depth” approach that addresses both internal and external threats. Defense-in-depth is based on the idea that any one point of protection may, and probably will, be defeated. This approach uses three different types of layers (physical, electronic, and procedural) and applies appropriate controls to address different risks that might arise in each. The same concept works for both physical and network security. Multiple layers of network security can protect networked assets, data and end points, just as multiple layers of physical security can protect high-value physical assets. With a defense-in-depth approach: • System security is purposely designed into the infrastructure from the beginning. Attackers are faced with multiple hurdles to overcome if they want to successfully break through or bypass the entire system. • A weakness or flaw in one layer can be protected by strength, capabilities or new variable introduced through other security layers. Typical defense-in-depth approaches involve six areas: physical, network, computer, application, device and staff education. 1. Physical Security – It seems obvious that physical security would be an important layer in a defense-in-depth strategy, but don’t take it for granted. Guards, gates, locks, port block-outs, and key cards all help keep people away from systems that shouldn’t touch or alter. In addition, the lines between the physical security systems and information systems are blurring as physical access can be tied to information access. 2. Network Security – An essential part of information fabric is network security and should be equipped with firewalls, intrusion detection and prevention systems (IDS/IPS), and general networking equipment such as switches and routers configured with their security features enabled. Zones establish domains of trust for security access and smaller virtual local area networks (VLANs) to shape and manage network traffic. A demilitarized zone between public resources and the internal or trusted resources allows data and services to be shared securely. 3. Computer Hardening – Well known (and published) software vulnerabilities are the number one way that intruders gain access to automation systems. Examples of Computer Hardening include the use of: • Antivirus software • Application whitelisting • Host intrusion-detection systems (HIDS) and other endpoint security solutions • Removal of unused applications, protocols and services • Closing unnecessary ports Software patching practices can work in concert with these hardening techniques to help further address computer risks that are susceptible to malware cyber risks including viruses and Trojans etc. Follow these guidelines to help reduce risk: • Disable software automatic updating services on PCs • Inventory target computers for applications, and software versions and revisions • Subscribe to and monitor vendor patch qualification services for patch compatibility • Obtain product patches and software upgrades directly from the vendor • Pre-test all patches on non-operational, non-mission critical systems • Schedule the application of patches and upgrades and plan for contingencies 4. Application Security – This refers infusing system applications with good security practices, such as a Role Based Access Control System,Multi-factor authentication (MFA) also known as (also known as 2FA) where ever possible which locks down access to critical process functions, force username/password logins, combinations, Multi-factor authentication (MFA) also known as (also known as 2FA) where ever possible and etc. 5. Device Hardening – Changing the default configuration of an embedded device out-of-the-box can make it more secure. The default security settings of PLCs, PACs, routers, switches, firewalls and other embedded devices will differ based on class and type, which subsequently changes the amount of work required to harden a particular device. But remember, a chain is only as strong as its weakest link. 6. Staff Education - Last but not least it’s important to talk to staff about keeping clean machine, the organization should have clear rules for what employees can install and keep on their work computers. Make sure they understand and abide by these rules. Following good password practices is important a strong password is a phrase that is at least 12 characters long. Employees should be encouraged to keep an eye out and say something if they notice strange happenings on their computer. Educating Employees at least once a year is important Training employees is a critical element of security. They need to understand the value of protecting customer and colleague information and their role in keeping it safe. They also need a basic grounding in other risks and how to make good judgments online. Most importantly, they need to know the policies and practices you expect them to follow in the workplace regarding Internet safety.
-End |
|
| 1 Comments
Tweet
|
|
Windows Update MiniTool is a free alternative to windows updateTuesday, November 1, 2016 - Posted by Keith A. Smith, in MicrosoftWindows Update MiniTool is a free alternative to the standard Windows Update, it puts you in control of updates by allowing you to search, install and block Windows updates as you please. Windows Update MiniTool Will provide the follow options: ◦ Check for updates ◦ Download updates ◦ Installing Updates ◦ Deleting installed updates ◦ Hiding unwanted updates ◦ Get direct links to the *.cab / *.Exe / *.Psf update files ◦ View update history ◦ Configure Automatic Updates This tool is like the external powershell module PSWindowsUpdate, but much more advanced and user-friendly features The tool relies and use same WU infrastructure, all downloading are through WU -- it's not a downloader! I have tested this on server 2016 along with windows 10 and it works great. 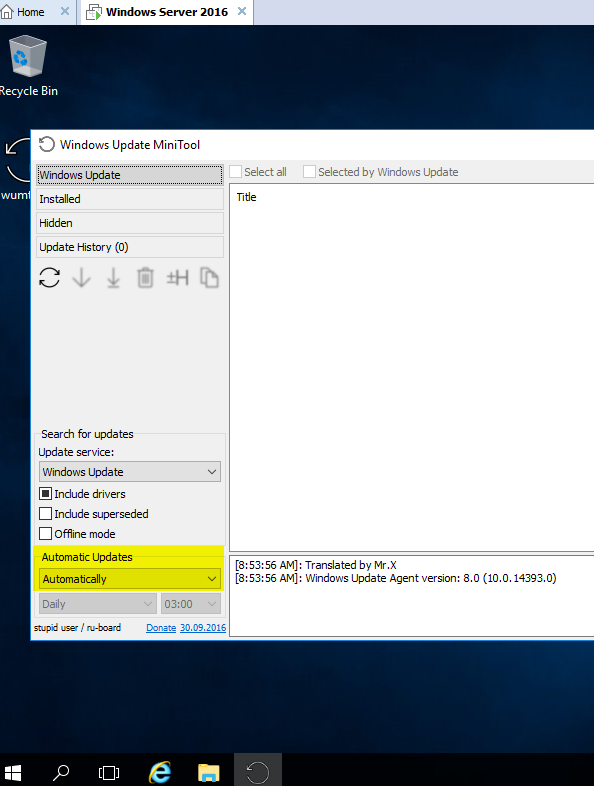 |
|
| 0 Comments
Tweet
|
|
Must have GPOs for Windows 10Tuesday, September 27, 2016 - Posted by Keith A. Smith, in MicrosoftI started testing Windows 10 Enterprise in my environment. I know there are a number of new features in Windows 10 that aren't great for domains (PIN codes, Microsoft Accounts, etc.). After digging through all the GPO settings, I decided on the on the following. Once the modification was made and applied to the test machines, I brought in a few non-IT staff for UAT testing of the images. Everything went well, so I decided to share the settings I used in the GPO
And last but not least is setting explorer's default to This PC instead of Quick Access by doing the following: HKEY_CURRENT_USER\Software\Microsoft\Windows\CurrentVersion\Explorer\Advanced Value Name: LaunchTo Type: DWORD Value: 1
|
|
| 0 Comments
Tweet
|
|
How to become a windows sysadminFriday, March 11, 2016 - Posted by Keith A. Smith, in Microsoft· Create two networks/VLANs (desktops and servers) · Install Windows Server (VM or standard hardware if you have it available) GUI Mode. · Install another server, single NIC on the server VLAN · Create your first active directory domain controller. · Create another server but this time make it a core server. Make it a domain controller · Test AD replication via the GUI and cmd. · Create an OU for your workstations; create an OU for your users, and an OU for groups. From now on, any new computer or new user account must go into their respective OU. DO NOT MOVE THE DOMAIN CONTROLLERS FROM THE DOMAIN CONTROLLER OU. · Create subnets in Active Directory Sites and Services to match the IP’s used on the VLANs you created. · Check out DNS. Do you have a reverse look up zone? No? Then set it up. · Check out DNS. Records can get old and out of date and will screw up name to IP resolution. Make it so that scavenging happens automatically. · You need to block facebook.com via windows DNS. Make it so that when a DNS look up is performed, computers use a loop back address. Test this via cmd to make sure it resolves as expected. · Set up DHCP on the first domain controller. · Set up a scope to hand out IPs for the Desktop VLAN. Make it so that this DHCP scope will be able to give endpoints the information they need networking wise to join a domain · Install a Windows endpoint or newer PC on the desktop VLAN · Your Windows endpoints are not getting IPs. Why? (hint: it's a routing/broadcast/relay issue) · Join that desktop to the domain · Now that you are getting IPs from your DHCP server, configure DHCP clustering. Load balancing or failover is your choice. Now test it. · Create a non-domain admin account in AD. Fill out the whole profile once the account is created. · Login to that Windows endpoint as a regular AD user and an Admin user. Try to install software under the non-admin account first and then the admin account. What is the difference? · Create another non-admin account. Make this non-admin user a local admin on that computer. Who else is also a local admin before you make any changes, · Review the attributes of that account in AD. You will need advanced features for this. · Create an AD group. Add the first non-admin account to this group. · On that desktop, install the RSAT tools so you can remotely manage another computer · Setup remote management on the core server so that it can be managed from the MMC of another computer (there are a number of ways to do this) · Find out what server is holding the FSMO roles via the GUI and the command prompt. · Split the FSMO roles between the servers. Try to keep forest level and domain level roles together. · On one of the domain controllers, create a file share set it so that only administrators and the second non admin account have access to it. Create another folder and give only the AD group you created permissions. · Use group policy to map both shares as network drives as a computer policy to the endpoint. · Login to the endpoint as the first domain user. Do you see the network drive mapped in windows explorer? No? Use gpresult via the cmd to find out why. If you do see it, try to access the drive. You should be denied if you set permissions correctly. Login as the second domain user, they should be able to open the mapped drive. · What if the account in the group tries to access the second drive? You should be able to get in. · Login to the windows endpoint as the second non-admin account. You should not have access to this drive because you are not in the group. Do not log off. Add this account to the group. Can you access the drive now? No? Logoff and login back in. Can you access the drive now? · Remove the share from the domain controller. We don't like putting shares on domain controllers if we don't have to. · Build out another two servers and join it to the domain as member servers. · Install DFS and File server roles/features on both servers. · Create a file share on bother servers with the same folder name. Create files on both servers. Make sure they are different. (i.e server1 will have "TextDoc01", server 2 will have "TextDoc02" in their shares). · Create a DFS name space. Add those shares to the name space. · On a domain joined endpoint, navigate to the DFS namespace you created. You should be able to see both files. · Create a DFS Replication group. Make it so that you have two way replication. You should now see both files on both servers. Make a change on one server and see if it replicates to another server. Does it work? Great. (you can shut down the file servers for now if you want or use them for the next step) · Configure WSUS so that you will only download Security updates for the desktop and server OS's ( highly recommend that you do not download any updates if you have access to the internet from this server) · Bonus points, install WSUS on another server and create a downstream server) · Create some groups in WSUS. Servers and endpoints will do nicely for names. · Create a new group policy that points workstations into the WSUS workstation group, points to WSUS for updates, and stop workstations from automatically downloading updates. · Read up on approving and pushing updates since the current assumption is that there are no updates to be pushed in this enclosed test network since there is no internet access to down load them. I believe there is a way to manually add updates to WSUS but I'm a bit foggy on that. Research it. · Do the same for servers. · Create a new AD user via powershell. · Create a new AD group via powershell. · Print a list of all domain users and computers in powershell, names only · Use powershell to pull a list of users who have remote as their office. If no users have remote listed as their office, use powershell to set that attribute and then pull users who have remote as their office. · Remove a user account from AD using powershell · Add a user to a group using powershell · Provision new AD users via a CSV in powershell This is really only scratching the surface of a
typical medium-large to enterprise level network. However, this should be
enough to get you started.
|
|
| 0 Comments
Tweet
|
Categories
 All Categories
Network
VMware
FOG aka Free Open Ghost
Xen
Journal of thoughts
SharePoint
Automation
Microsoft
Linux
Security
Apple
All Categories
Network
VMware
FOG aka Free Open Ghost
Xen
Journal of thoughts
SharePoint
Automation
Microsoft
Linux
Security
Apple
Subscription
