VMware
Keith Smith - My Blog > VMwareApplying a “Defense-in-Depth” StrategyMonday, May 22, 2017 - Posted by Keith A. Smith, in Network, VMware, Microsoft, Linux, SecurityIT Teams and Staff can effectively maintain physical and information security with a “defense-in-depth” approach that addresses both internal and external threats. Defense-in-depth is based on the idea that any one point of protection may, and probably will, be defeated. This approach uses three different types of layers (physical, electronic, and procedural) and applies appropriate controls to address different risks that might arise in each. The same concept works for both physical and network security. Multiple layers of network security can protect networked assets, data and end points, just as multiple layers of physical security can protect high-value physical assets. With a defense-in-depth approach: • System security is purposely designed into the infrastructure from the beginning. Attackers are faced with multiple hurdles to overcome if they want to successfully break through or bypass the entire system. • A weakness or flaw in one layer can be protected by strength, capabilities or new variable introduced through other security layers. Typical defense-in-depth approaches involve six areas: physical, network, computer, application, device and staff education. 1. Physical Security – It seems obvious that physical security would be an important layer in a defense-in-depth strategy, but don’t take it for granted. Guards, gates, locks, port block-outs, and key cards all help keep people away from systems that shouldn’t touch or alter. In addition, the lines between the physical security systems and information systems are blurring as physical access can be tied to information access. 2. Network Security – An essential part of information fabric is network security and should be equipped with firewalls, intrusion detection and prevention systems (IDS/IPS), and general networking equipment such as switches and routers configured with their security features enabled. Zones establish domains of trust for security access and smaller virtual local area networks (VLANs) to shape and manage network traffic. A demilitarized zone between public resources and the internal or trusted resources allows data and services to be shared securely. 3. Computer Hardening – Well known (and published) software vulnerabilities are the number one way that intruders gain access to automation systems. Examples of Computer Hardening include the use of: • Antivirus software • Application whitelisting • Host intrusion-detection systems (HIDS) and other endpoint security solutions • Removal of unused applications, protocols and services • Closing unnecessary ports Software patching practices can work in concert with these hardening techniques to help further address computer risks that are susceptible to malware cyber risks including viruses and Trojans etc. Follow these guidelines to help reduce risk: • Disable software automatic updating services on PCs • Inventory target computers for applications, and software versions and revisions • Subscribe to and monitor vendor patch qualification services for patch compatibility • Obtain product patches and software upgrades directly from the vendor • Pre-test all patches on non-operational, non-mission critical systems • Schedule the application of patches and upgrades and plan for contingencies 4. Application Security – This refers infusing system applications with good security practices, such as a Role Based Access Control System,Multi-factor authentication (MFA) also known as (also known as 2FA) where ever possible which locks down access to critical process functions, force username/password logins, combinations, Multi-factor authentication (MFA) also known as (also known as 2FA) where ever possible and etc. 5. Device Hardening – Changing the default configuration of an embedded device out-of-the-box can make it more secure. The default security settings of PLCs, PACs, routers, switches, firewalls and other embedded devices will differ based on class and type, which subsequently changes the amount of work required to harden a particular device. But remember, a chain is only as strong as its weakest link. 6. Staff Education - Last but not least it’s important to talk to staff about keeping clean machine, the organization should have clear rules for what employees can install and keep on their work computers. Make sure they understand and abide by these rules. Following good password practices is important a strong password is a phrase that is at least 12 characters long. Employees should be encouraged to keep an eye out and say something if they notice strange happenings on their computer. Educating Employees at least once a year is important Training employees is a critical element of security. They need to understand the value of protecting customer and colleague information and their role in keeping it safe. They also need a basic grounding in other risks and how to make good judgments online. Most importantly, they need to know the policies and practices you expect them to follow in the workplace regarding Internet safety.
-End |
 1 Comments 1 CommentsTweet |
vSphere 6.0 vCenter Windows 2012 R2 with SQL Server Install GuideTuesday, September 29, 2015 - Posted by Keith A. Smith, in VMware, Microsoft
VMware vSphere 6.0 has brought a simplified deployment model where the dependency on Microsoft SQL server has been reduced. You now have the option of using the built-in vPostgre SQL provided by VMware, vPostgres on windows is limited to 20 hosts and 200 virtual machines.
vCenter System requirements
Supported Windows Operation System for vCenter 6.0 Installation:
Supported Databases for vCenter 6.0 Installation:
1. Make sure that you using static IP for your VM and you create forward and reverse DNS records on your DNS server. Also make sure that the machine is part of Windows domain. 2. Create an account in your Active Directory, this will be used on the SQL server for the vCenter database 3. Now you need to create a blank SQL database on an SQL server. 4. Once your blank database is created, you need to add the account you created in your Active Directory. Make sure to give it sysadmin for the server role.
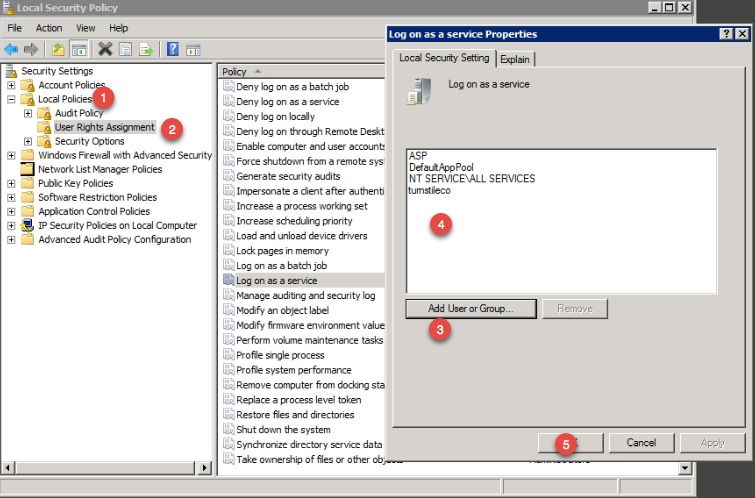
Before you start the installer make sure your Windows Server VM is fully patched, otherwise you might get a prompt to patch the server. The two patches that are needed are below 5. During the vCenter installation process you might get a prompt asking to give the administrator’s account the right to Log On as a service on the server that run vCenter. You need to grant the domain account you created earlier the right to Log On as a service. The steps:
6. Important - The SQL server native client is necessary to create the system DSN. To download the SQL Server Native Client, click on the link below This ODBC Driver for SQL Server supports x86 and x64 connections to SQL Azure Database, SQL Server 2012, SQL Server 2008 R2, SQL Server 2008, and SQL Server 2005.
http://www.microsoft.com/en-us/download/confirmation.aspx?id=36434
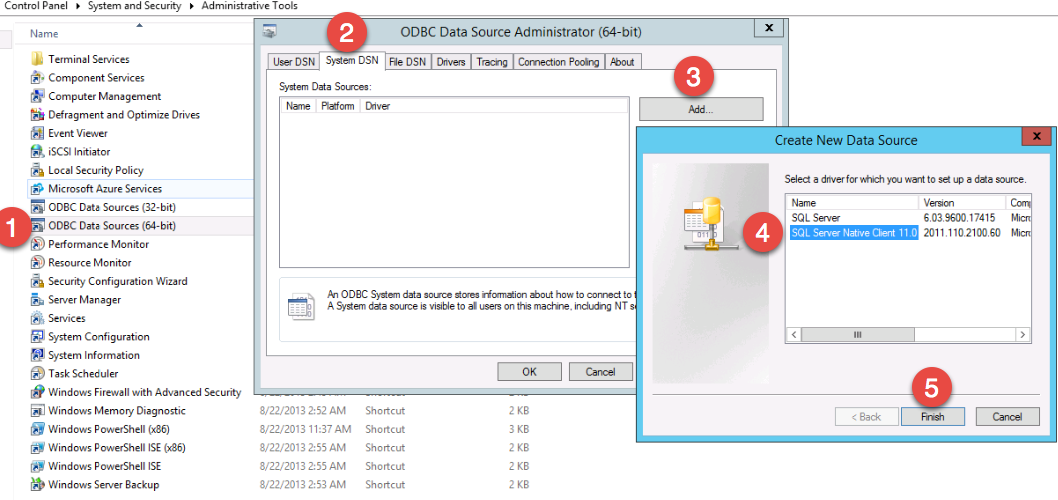
7. Now that the SQL Server Native Client is installed, create system DSN through ODBC data source administrator (64-bit).
Proceed through the wizard 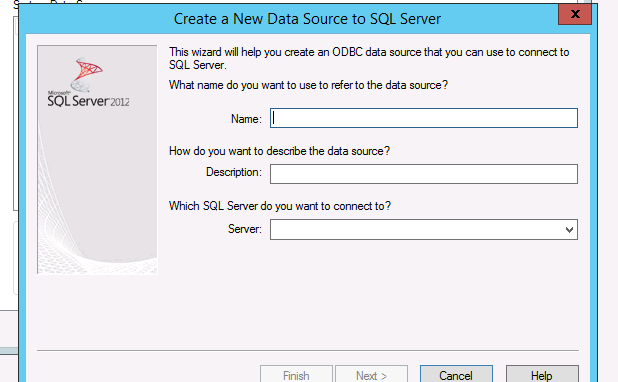
8. Once you have fill out all the SQL server information, make sure you test the data source 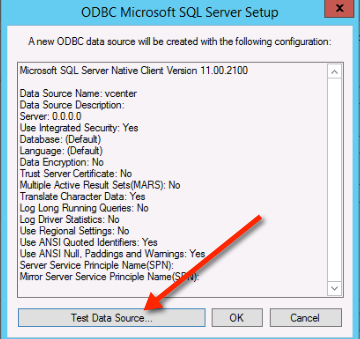
If you everything is setup correctly then you should see this 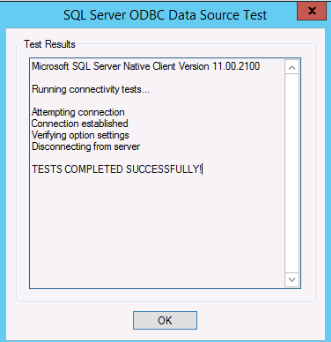
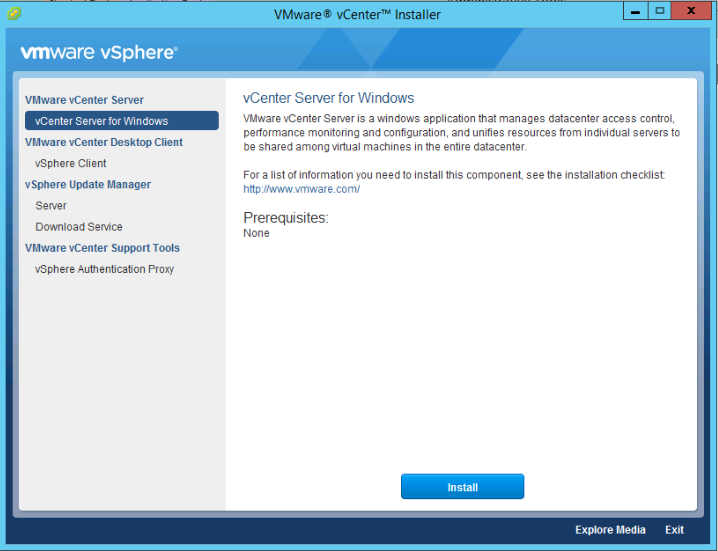
9. Mount the vCenter server ISO and double click the autorun.exe
10. Proceed through the vCenter install
11. Once you get to the database settings, you will need to choose use an external database. If you DSN is blank then click the refresh button and it should appear 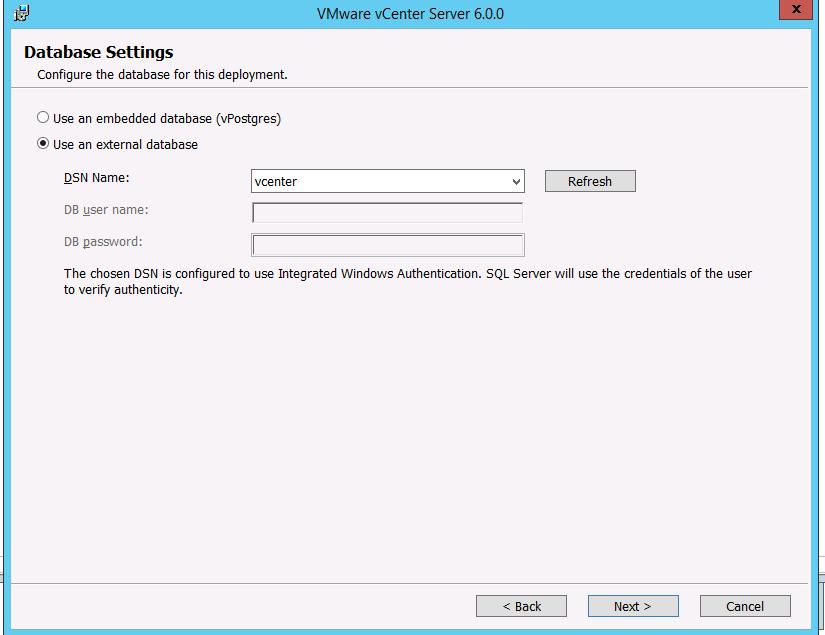
Continue the setup wizard and leave the default values… You should see the setup complete screen. At this point you can open up a browser and visit the vCenter interface which uses adobe flash.
-End |
 0 Comments 0 CommentsTweet |
vCenter 6.0 interface sucksThursday, September 10, 2015 - Posted by Keith A. Smith, in VMware, Journal of thoughts
As mentioned here http://bit.ly/1UrCpqN, I finally made the move back to vSphere and decided to go with version 6. There has been chatter over the past few years that, the release of a great new web client was coming. Well, it finally came and honestly, they would have been better off sticking with the fat client. Why..? You may ask. Because the interface is Flash! Yes, the same Flash that should have been deprecated by now, the same Flash that has more Zero-day vulnerabilities than a tennis net has holes. I don't understand why any company would develop an interface in Flash or Java at this point. I can here some people at VMware saying if we were to develop the vSphere 6 web client in HTML5 it would take more time. I think most if not all customers would say ok take the time, because HTML5 is the best way to go point blank!
I will say this, the vCenter doesn't totally suck
Positive: 1) New platform architecture 2) Upgrade process is supposed to be a lot easier
Negatives: 1) Uses Flash — vulnerabilities, vulnerabilities, usability is terrible. 2) Uses Java — A catastrophe, Issues with every Java upgrade that are compatibility related,"security enhancements", vulnerabilities 3) Uses browsers & plugins — impacted by browser releases or changes, versions, vulnerabilities
I think that VMware needs to be more transparent about what they are doing with the replacement of this terrible Flash interface. I also think that they need to keep the TAM's informed so they can keep customers apprised of the progress.
-End |
 1 Comments 1 CommentsTweet |
system_thread_exception_not_handled xen.sys BSODFriday, September 4, 2015 - Posted by Keith A. Smith, in VMware, Xen, Microsoft, LinuxThe system_thread_exception_not_handled xen.sys BSOD issue was interesting to me;  I wanted to see if I could reproduce this. I exported a VM from Amazon's EC2 because Amazon EC2 uses the Xen hypervisor as well. I upload the VM into a datastore on vSphere and convert the virutal disk as I noted here http://bit.ly/1UrCpqN I power on the VM and I get the same system_thread_exception_not_handled xen.sys BSOD. I boot into safe mode I run a msconfig from the search, Under the boot tab I chose base video because I still had the xentools installed on the VM's. So that had to be the culprit right? I reboot the VM, and it boots fine, at this point I uninstall all the XenServer/Citrix related items. I then restart the VM and I was glad to see it make it to the login screen. Solution: I think...  The way to avoid this issue if you are going from Xen to VMware or any other hypervisor is to uninstall all the XenServer/Citrix items before performing the export of the VM.
|
 1 Comments 1 CommentsTweet |
XenServer to VMware MigrationFriday, September 4, 2015 - Posted by Keith A. Smith, in Network, VMware, Xen, MicrosoftWell, it's time to put XenServer out to pasture in favor of vSphere 6.0, the coolest thing I will miss is XenCenter which can be installed on any modern Windows OS. In the Citrix world, you do not need a dedicated XenCenter server. In the VMware world you do need a dedicated vCenter server. Not that big of a deal, but something to note if any of you start comparing the products. Start with interoperability testing In the past, I have used some version of the vCenter Converter to convert VM's from some other product. I figured I would test the theory of simply exporting a VM's from xencenter in an ovf format and importing it into vcenter. That attempt failed with the following error "Could not parse the document: 'encoding specified in XML declaration is incorrect". Upon testing the same ovf export on VMware workstation and virtualbox I received the same error. Back to the old Method It would have been great to power off VM's then export them from xencenter, then import them into vCenter. With this not being possible at the time I proceed to fire up the vCenter Converter. Using the vCenter Converter I was able to convert a few of the VM's, in some of the other attempts I received errors like converter error "Host hosts.allow: ALL:LOCAL,x.x.x.x hosts.deny: ALL:ALL Another workaround for the *nix VM's is to upload the virtual disks to the datastore, and then proceed to convert them. At this point, you could create a new virtual machine and use the new created virtual for that machine. For me, this worked great, and the *nix VM's would boot successfully. In some of the other cases, I changed from hostname to IP in the vCenter Converter, and that allowed me to convert the nix VM. I also had some instants where Windows VM's wouldn't convert; they would fail and say 3% network is unreachable host key can't be retrieved or a certificate in the host's chain is based on an untrusted root converter. For the VM's that gave those errors, I installed the vCenter Converter on the VM itself and chose This local Machine at the target. As you can see, I did quite a few workarounds to keep making progress on exporting the VM's. Into to vSphere as the final destination At this point, I have all VM's exported, I proceed to upload them into a datastore in vSphere environment. After the uploads were complete, I had to convert the disks to proper vmdk's that could be used by the VM on vSphere. On the hypervisor I enable SSH, I then proceed to SSH into the hypervisor and make my way into the datastore that housed the VM's. There were quite a few sub directory's so I had to travel into each one cd /vmfs/volumes/whatever/foldername/VMName then run vmkfstools -i currentvirtualdiskname.vmdk newvirtualdiskname.vmdk I had to do that for all the virtual disks that were uploaded. Once all that was done I added the vmx files to the vCenter Inventory, from there I had to remove the original virtual disk's and attach the new virtual disk I created. In the process, I was prompted to remove and delete the old virtual disks which is nice because that way I won't have to go back and clean up the old virtual disks. I now power on one 2012R2 VM and one 2008R2 VM for testing to ensure that they boot up and function as they should. The 2008R2 boots fine however, the 2012R2 VM blows up with the BSOD. I power up another 2012R2 VM so see if this is a one-off or not, of course, the same result of a BSOD with the error of system_thread_exception_not_handled xen.sys. 
At this point I know there is something wrong with 2012R2 and Xen, I had to boot up the VM in safe mode by choosing Troubleshoot. 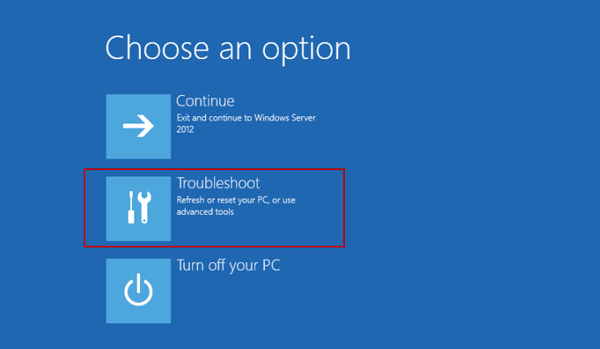 Click Advanced options 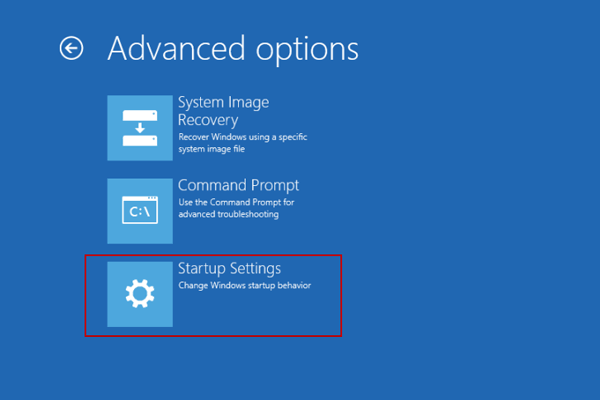
Click Startup Settings. 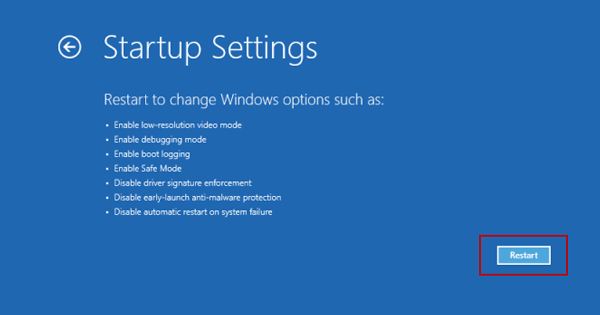
Click Restart Once in safe mode I run a msconfig from the search, Under the boot tab I chose base video 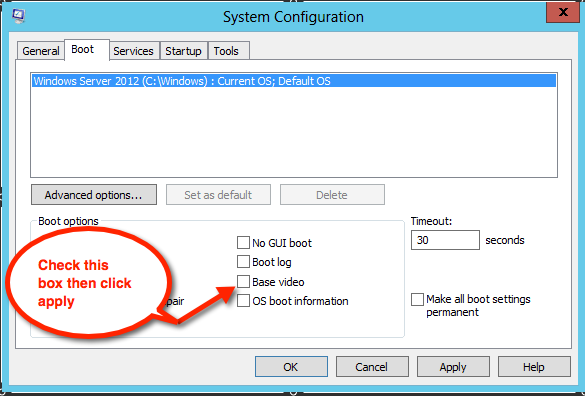
I still had the Citrix/Xen related items installed on the VM's, so that had to be the culprit. 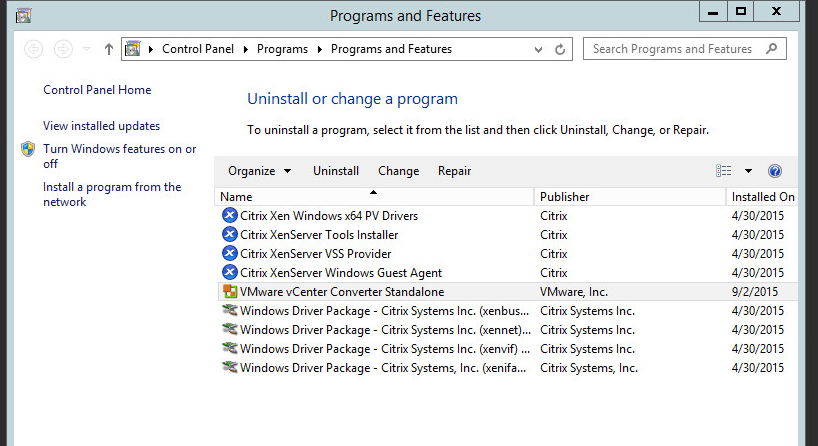
I reboot the VM and it boots fine, at this point I uninstall all the XenServer/Citrix related items. I then restart the VM, and I was glad to see it make it to the login screen. I did have some cases where the VM did BSOD after the msconfig modification and XenServer/Citrix items were remove but upon a restart the VM does proceed to the login screen. I had to do the aforementioned procedure for every 2012R2 VM that had a BSOD system_thread_exception_not_handled xen.sys. I should note that this project took me about 3 1/2 days to complete due to the above technical complications and many other variables.
|
 0 Comments 0 CommentsTweet |


