
Microsoft
Keith Smith - My Blog > MicrosoftvSphere 6.0 vCenter Windows 2012 R2 with SQL Server Install GuideTuesday, September 29, 2015 - Posted by Keith A. Smith, in VMware, Microsoft
VMware vSphere 6.0 has brought a simplified deployment model where the dependency on Microsoft SQL server has been reduced. You now have the option of using the built-in vPostgre SQL provided by VMware, vPostgres on windows is limited to 20 hosts and 200 virtual machines.
vCenter System requirements
Supported Windows Operation System for vCenter 6.0 Installation:
Supported Databases for vCenter 6.0 Installation:
1. Make sure that you using static IP for your VM and you create forward and reverse DNS records on your DNS server. Also make sure that the machine is part of Windows domain. 2. Create an account in your Active Directory, this will be used on the SQL server for the vCenter database 3. Now you need to create a blank SQL database on an SQL server. 4. Once your blank database is created, you need to add the account you created in your Active Directory. Make sure to give it sysadmin for the server role.
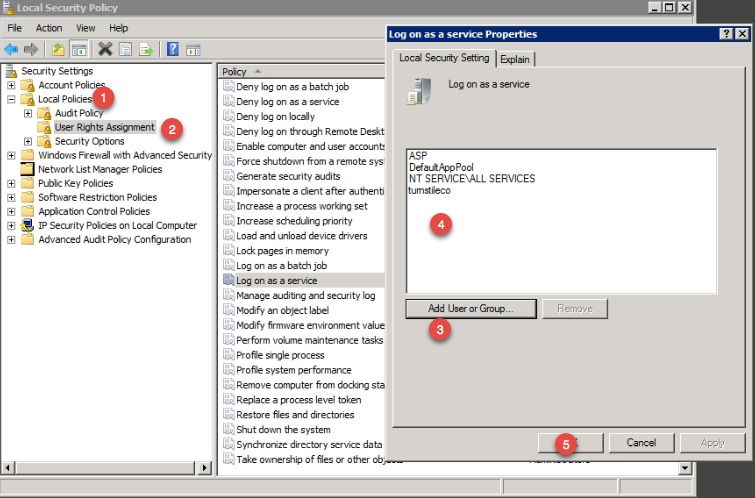
Before you start the installer make sure your Windows Server VM is fully patched, otherwise you might get a prompt to patch the server. The two patches that are needed are below 5. During the vCenter installation process you might get a prompt asking to give the administrator’s account the right to Log On as a service on the server that run vCenter. You need to grant the domain account you created earlier the right to Log On as a service. The steps:
6. Important - The SQL server native client is necessary to create the system DSN. To download the SQL Server Native Client, click on the link below This ODBC Driver for SQL Server supports x86 and x64 connections to SQL Azure Database, SQL Server 2012, SQL Server 2008 R2, SQL Server 2008, and SQL Server 2005.
http://www.microsoft.com/en-us/download/confirmation.aspx?id=36434
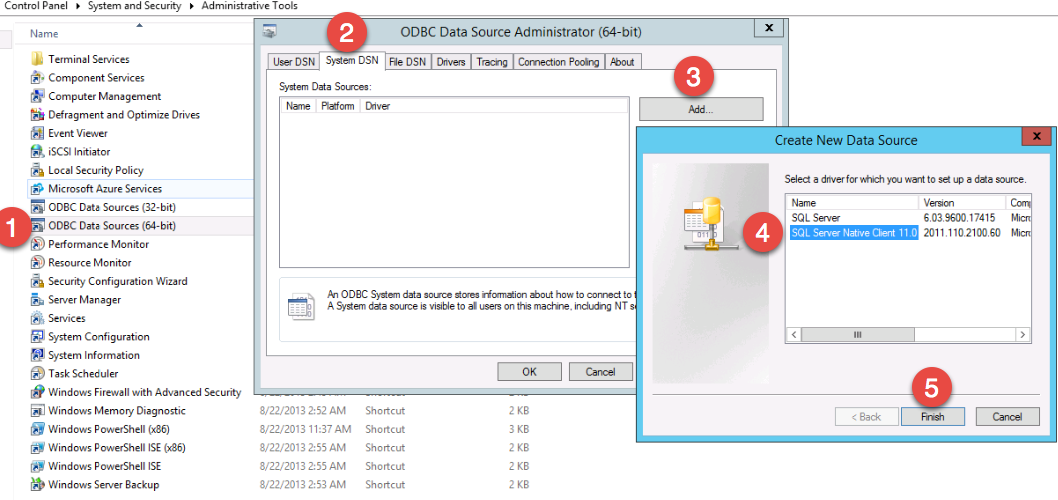
7. Now that the SQL Server Native Client is installed, create system DSN through ODBC data source administrator (64-bit).
Proceed through the wizard 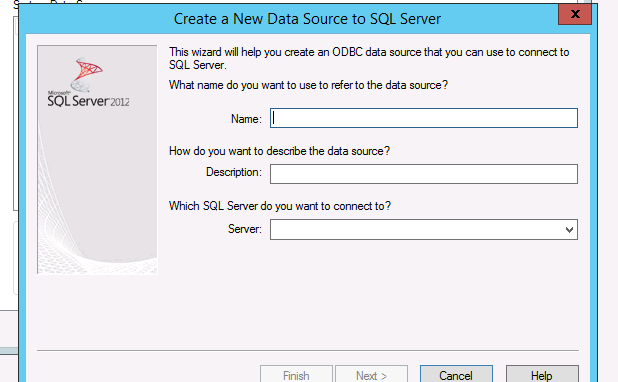
8. Once you have fill out all the SQL server information, make sure you test the data source 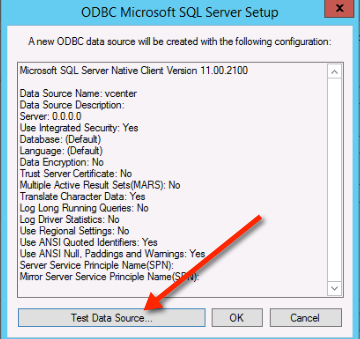
If you everything is setup correctly then you should see this 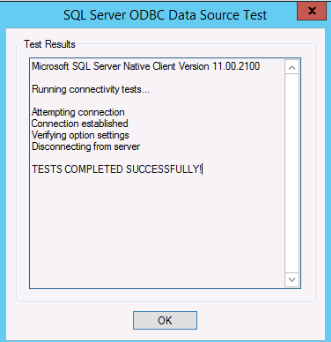
9. Mount the vCenter server ISO and double click the autorun.exe
10. Proceed through the vCenter install
11. Once you get to the database settings, you will need to choose use an external database. If you DSN is blank then click the refresh button and it should appear 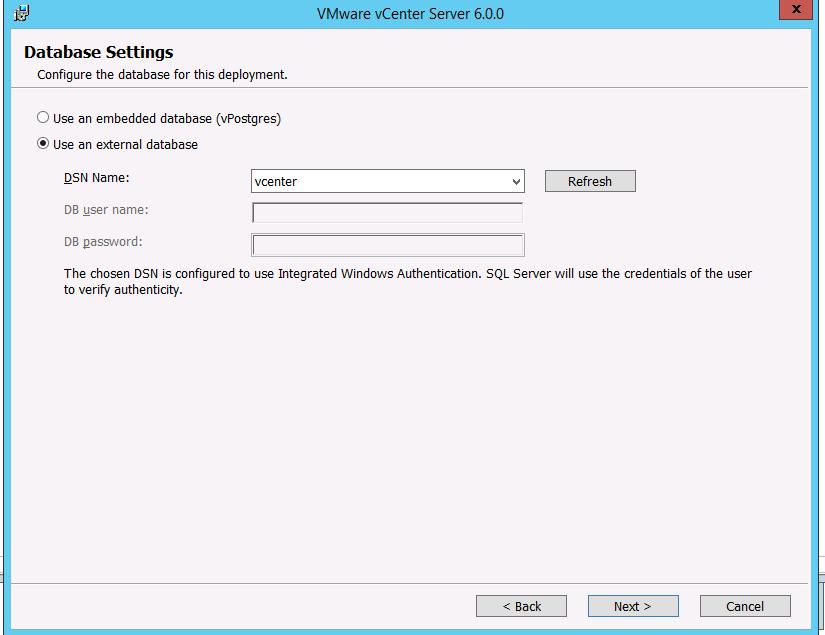
Continue the setup wizard and leave the default values… You should see the setup complete screen. At this point you can open up a browser and visit the vCenter interface which uses adobe flash.
-End |
|
 0 Comments 0 Comments Tweet
Tweet
|
|
Apply BgInfo via Group Policy Logon ScriptMonday, September 28, 2015 - Posted by Keith A. Smith, in Microsoft
BgInfo is a well known tool that allows having a background Wallpaper showing some information about your system. This will save time when the need arises to collect details or troubleshoot your systems.
To centrally apply BgInfo I recommend the use of a Group Policy Logon script. 1. Prepare the Background Wallpaper to apply via BgInfo: You need to: • Copy the BgInfo.exe in a folder on \\yourdomain\netlogon • Run BgInfo.exe, prepare the fields to display and then save your template in a .bgi file 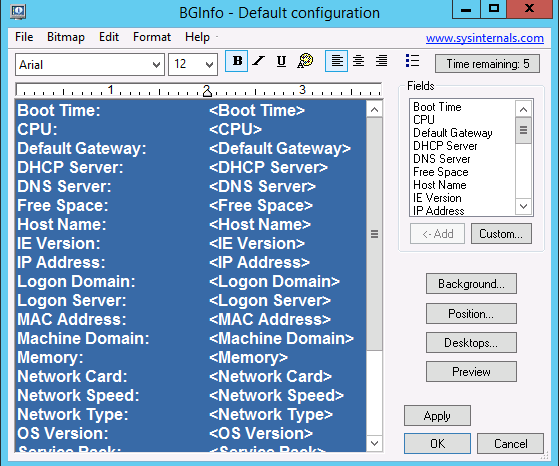
2. 2. Prepare a Logon Script to run BgInfo: You can use the following script to run BgInfo:
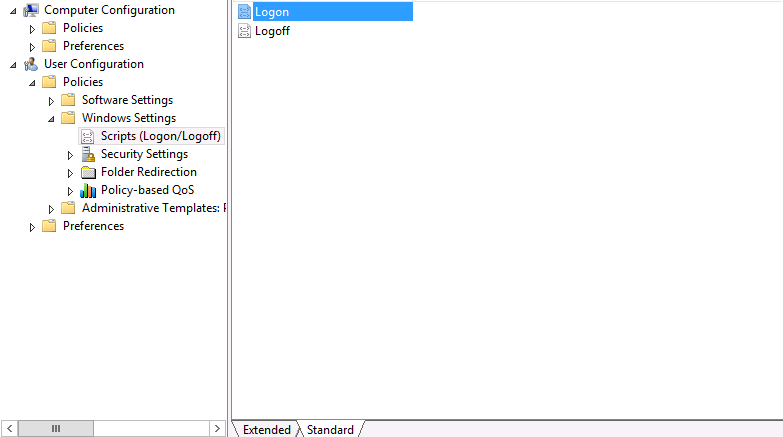
The commands above can be saved in a .bat file in Netlogon folder 3. 3. Apply BgInfo logon script using a Group Policy: To apply BgInfo logon script using a Group Policy, proceed like the following:
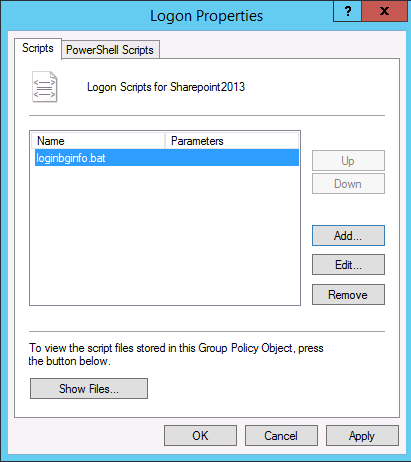
After that, you need to link your Group Policy to the OU containing the accounts on which it will be applied.
-End
|
|
| 0 Comments
Tweet
|
|
How To Restore Multiple SQL Databases At One TimeWednesday, September 9, 2015 - Posted by Keith A. Smith, in MicrosoftOne of the things I had on my to-do list was to take backups of a few SQL databases used by production systems, this way testing could be done in a separate environment. During the last Maintenance window, I got a chance to do this. The steps were: 1. Spin up a new server (perform normal S.O.P for provisioning) 2. Install SQL Server 3. On the new test SQL server, Add/create security logins (they need to match the source, which would the SQL server where the database came from) 4. On prod servers, that had multiple databases I setup a Maintenance plan that would take a full backup of the databases I selected.  I did this because it was a quick and easy way to backup multiple databases in one fell swoop. I stop the services on the application servers to halt data being written then execute the Maintenance plan. At this point, I move all the backups to the new test SQL server. I now have backups of all the databases I wanted in. bak files. I now am tasked with having to restore quite a few databases to this new SQL server. It would be great if I could do the reverse of #4 and restore multiple SQL databases at the same time, unfortunately that is not an option from within the SQL Management studio. I could have created SSIS Packages to copy the data between data sources but chose not to on this opportunity. I had an idea! If you go in the SQL Management Studio, then go through all the steps to do the SQL database restore, choose a source and destination database. Then go to the script drop down to copy the T-SQL script 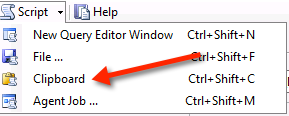 which looked like this RESTORE DATABASE [DBNAME] FILE = N'DBNAME' FROM DISK = N'v:\DBNAME_backup_2015_09_09_RANDOM.bak' WITH FILE = 1, NOUNLOAD, STATS = 10 GO Where the DBNAME is that would be the database name as it would show in the SQL Management studio. Now with the T-SQL script there I wanted to get the names of all the SQL backups, for this I ran the following from a command line driveletter:\folder\dir /b>list.txt This will create the text file inside that folder. If you want the file output elsewhere, use a fully qualified name. Remember that Windows uses \ as the directory delimiter, not / Now using the list.txt file I created, I take the names of the databases and insert them in the T-SQL script where it says DBNAME. I do this for each database using some other methods to speed this part up. Once this is completed I execute the query; it took a few minutes, but results show no errors when completed. I refresh the Object Explorer, and now all the databases are attached. I was able to change a string on a test application server, and point it at the new test SQL to confirm that the application was going to work. A Restart of a few services and success! Data is present and current at least at the time of the backup.
|
|
| 0 Comments
Tweet
|
|
system_thread_exception_not_handled xen.sys BSODFriday, September 4, 2015 - Posted by Keith A. Smith, in VMware, Xen, Microsoft, LinuxThe system_thread_exception_not_handled xen.sys BSOD issue was interesting to me;  I wanted to see if I could reproduce this. I exported a VM from Amazon's EC2 because Amazon EC2 uses the Xen hypervisor as well. I upload the VM into a datastore on vSphere and convert the virutal disk as I noted here http://bit.ly/1UrCpqN I power on the VM and I get the same system_thread_exception_not_handled xen.sys BSOD. I boot into safe mode I run a msconfig from the search, Under the boot tab I chose base video because I still had the xentools installed on the VM's. So that had to be the culprit right? I reboot the VM, and it boots fine, at this point I uninstall all the XenServer/Citrix related items. I then restart the VM and I was glad to see it make it to the login screen. Solution: I think...  The way to avoid this issue if you are going from Xen to VMware or any other hypervisor is to uninstall all the XenServer/Citrix items before performing the export of the VM.
|
|
| 1 Comments
Tweet
|
|
XenServer to VMware MigrationFriday, September 4, 2015 - Posted by Keith A. Smith, in Network, VMware, Xen, MicrosoftWell, it's time to put XenServer out to pasture in favor of vSphere 6.0, the coolest thing I will miss is XenCenter which can be installed on any modern Windows OS. In the Citrix world, you do not need a dedicated XenCenter server. In the VMware world you do need a dedicated vCenter server. Not that big of a deal, but something to note if any of you start comparing the products. Start with interoperability testing In the past, I have used some version of the vCenter Converter to convert VM's from some other product. I figured I would test the theory of simply exporting a VM's from xencenter in an ovf format and importing it into vcenter. That attempt failed with the following error "Could not parse the document: 'encoding specified in XML declaration is incorrect". Upon testing the same ovf export on VMware workstation and virtualbox I received the same error. Back to the old Method It would have been great to power off VM's then export them from xencenter, then import them into vCenter. With this not being possible at the time I proceed to fire up the vCenter Converter. Using the vCenter Converter I was able to convert a few of the VM's, in some of the other attempts I received errors like converter error "Host hosts.allow: ALL:LOCAL,x.x.x.x hosts.deny: ALL:ALL Another workaround for the *nix VM's is to upload the virtual disks to the datastore, and then proceed to convert them. At this point, you could create a new virtual machine and use the new created virtual for that machine. For me, this worked great, and the *nix VM's would boot successfully. In some of the other cases, I changed from hostname to IP in the vCenter Converter, and that allowed me to convert the nix VM. I also had some instants where Windows VM's wouldn't convert; they would fail and say 3% network is unreachable host key can't be retrieved or a certificate in the host's chain is based on an untrusted root converter. For the VM's that gave those errors, I installed the vCenter Converter on the VM itself and chose This local Machine at the target. As you can see, I did quite a few workarounds to keep making progress on exporting the VM's. Into to vSphere as the final destination At this point, I have all VM's exported, I proceed to upload them into a datastore in vSphere environment. After the uploads were complete, I had to convert the disks to proper vmdk's that could be used by the VM on vSphere. On the hypervisor I enable SSH, I then proceed to SSH into the hypervisor and make my way into the datastore that housed the VM's. There were quite a few sub directory's so I had to travel into each one cd /vmfs/volumes/whatever/foldername/VMName then run vmkfstools -i currentvirtualdiskname.vmdk newvirtualdiskname.vmdk I had to do that for all the virtual disks that were uploaded. Once all that was done I added the vmx files to the vCenter Inventory, from there I had to remove the original virtual disk's and attach the new virtual disk I created. In the process, I was prompted to remove and delete the old virtual disks which is nice because that way I won't have to go back and clean up the old virtual disks. I now power on one 2012R2 VM and one 2008R2 VM for testing to ensure that they boot up and function as they should. The 2008R2 boots fine however, the 2012R2 VM blows up with the BSOD. I power up another 2012R2 VM so see if this is a one-off or not, of course, the same result of a BSOD with the error of system_thread_exception_not_handled xen.sys.
At this point I know there is something wrong with 2012R2 and Xen, I had to boot up the VM in safe mode by choosing Troubleshoot. 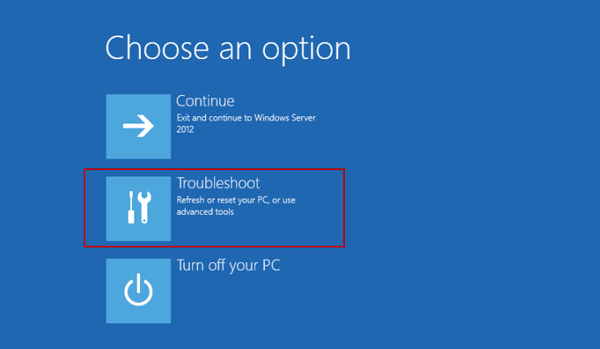 Click Advanced options 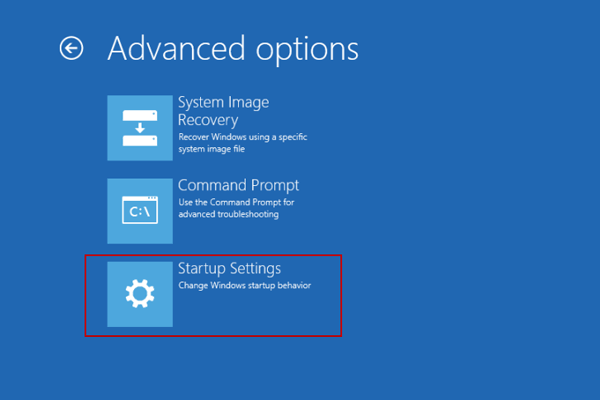
Click Startup Settings. 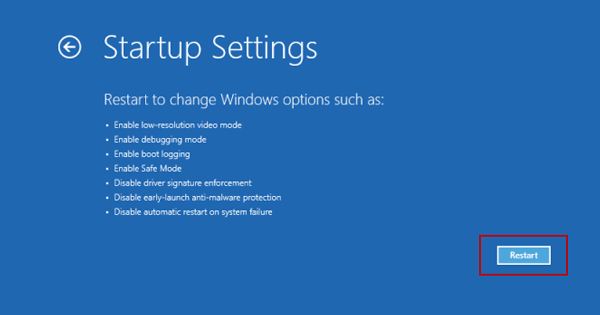
Click Restart Once in safe mode I run a msconfig from the search, Under the boot tab I chose base video 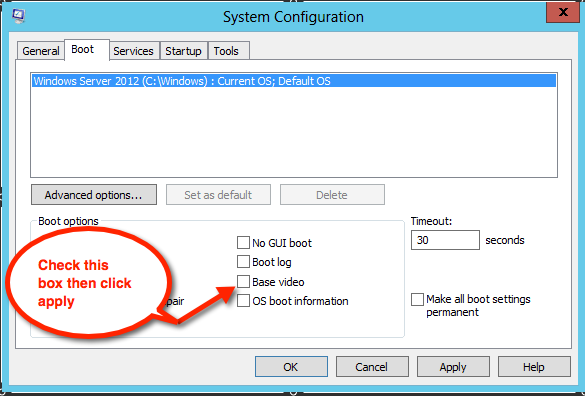
I still had the Citrix/Xen related items installed on the VM's, so that had to be the culprit. 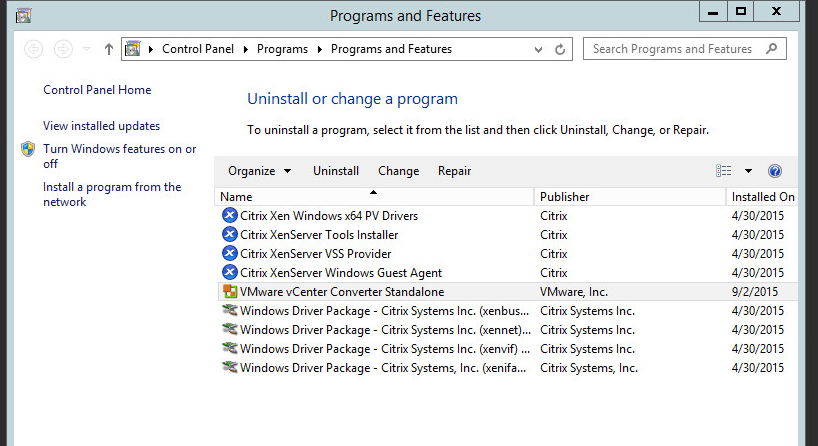
I reboot the VM and it boots fine, at this point I uninstall all the XenServer/Citrix related items. I then restart the VM, and I was glad to see it make it to the login screen. I did have some cases where the VM did BSOD after the msconfig modification and XenServer/Citrix items were remove but upon a restart the VM does proceed to the login screen. I had to do the aforementioned procedure for every 2012R2 VM that had a BSOD system_thread_exception_not_handled xen.sys. I should note that this project took me about 3 1/2 days to complete due to the above technical complications and many other variables.
|
|
| 0 Comments
Tweet
|
Categories
 All Categories
Network
VMware
FOG aka Free Open Ghost
Xen
Journal of thoughts
SharePoint
Automation
Microsoft
Linux
Security
Apple
All Categories
Network
VMware
FOG aka Free Open Ghost
Xen
Journal of thoughts
SharePoint
Automation
Microsoft
Linux
Security
Apple
Subscription
